Introduction to Softr.io and Airtable
Softr.io is an amazing tool to build internal tools, marketplaces, wikis, and a lot of other apps. However, it’s not that simple to manipulate data when it comes to build a secure marketplace, especially between Airtable and Softr.io.
Consequently, manipulating sensitive data can be dangerous. For example, if precautions aren’t taken, people can go into the code and get access to sensitive data like emails, phone numbers, or credit card information. This is why it is necessary to apply a strict and rigorous method to protect data. We highly recommend following this step-by-step guide to prevent data leaks and upgrade the security.
This step-by-step guide will demonstrate how to build a secure marketplace with the interface of Softr.io and with the database in Airtable using look-ups.
This method uses the look-up feature in Airtable. We use it to create relationships between one-to-many tables.
Part I : Build the foundation in Airtable
To begin, building some tables and entering basic information inside them is required before creating the Softr.io application.
Step 1: Build the table “Private User Database”
- Start by creating an Airtable user database. This table will never be directly linked to Softr.io.
- Inside of this database create a private user database table called “Private User Database”.
- Delete all the columns created by default by Airtable
- Transform the first column from the field “single line text” to an “Autonumber” field.
- Let’s start by adding some user information.
In this case :
- “Last Name”, Field Used: Single line text
- “First name”, Field Used: Single line text
- “Email”, Field Used: Email
- “Phone”, Field Used: Phone number
- “Address”, Field Used: Single line text
Step 2: Build the table “Public User Database”
To continue, building a second table is required before creating the Softr.io application. This table will be connected to Softr.io, as there is no sensitive data, this is why we are calling it “Public User Database” and creating a “Link to another record” field.
- Create a second table in the same user database. We will call this table “Public User Database”.
- Delete all the columns created by default by Airtable.
- Create a “Link to another record” field.
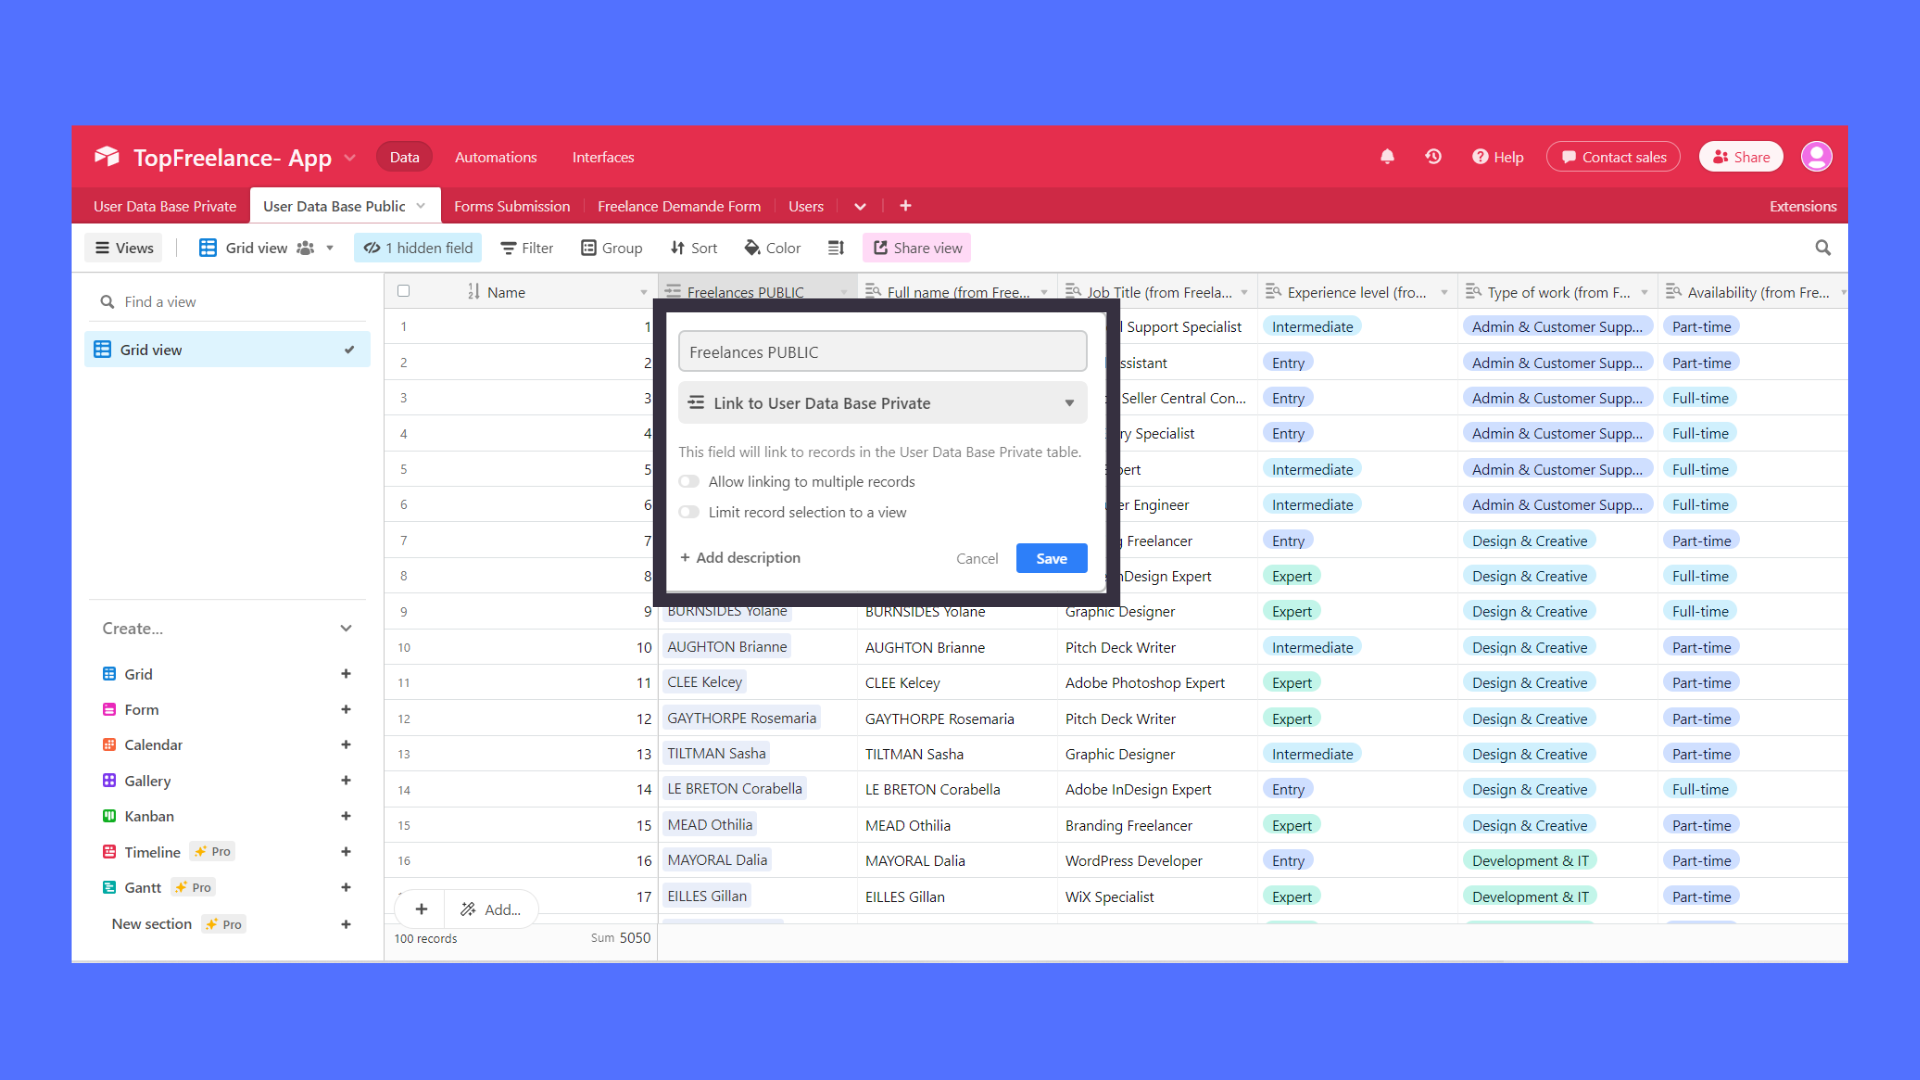
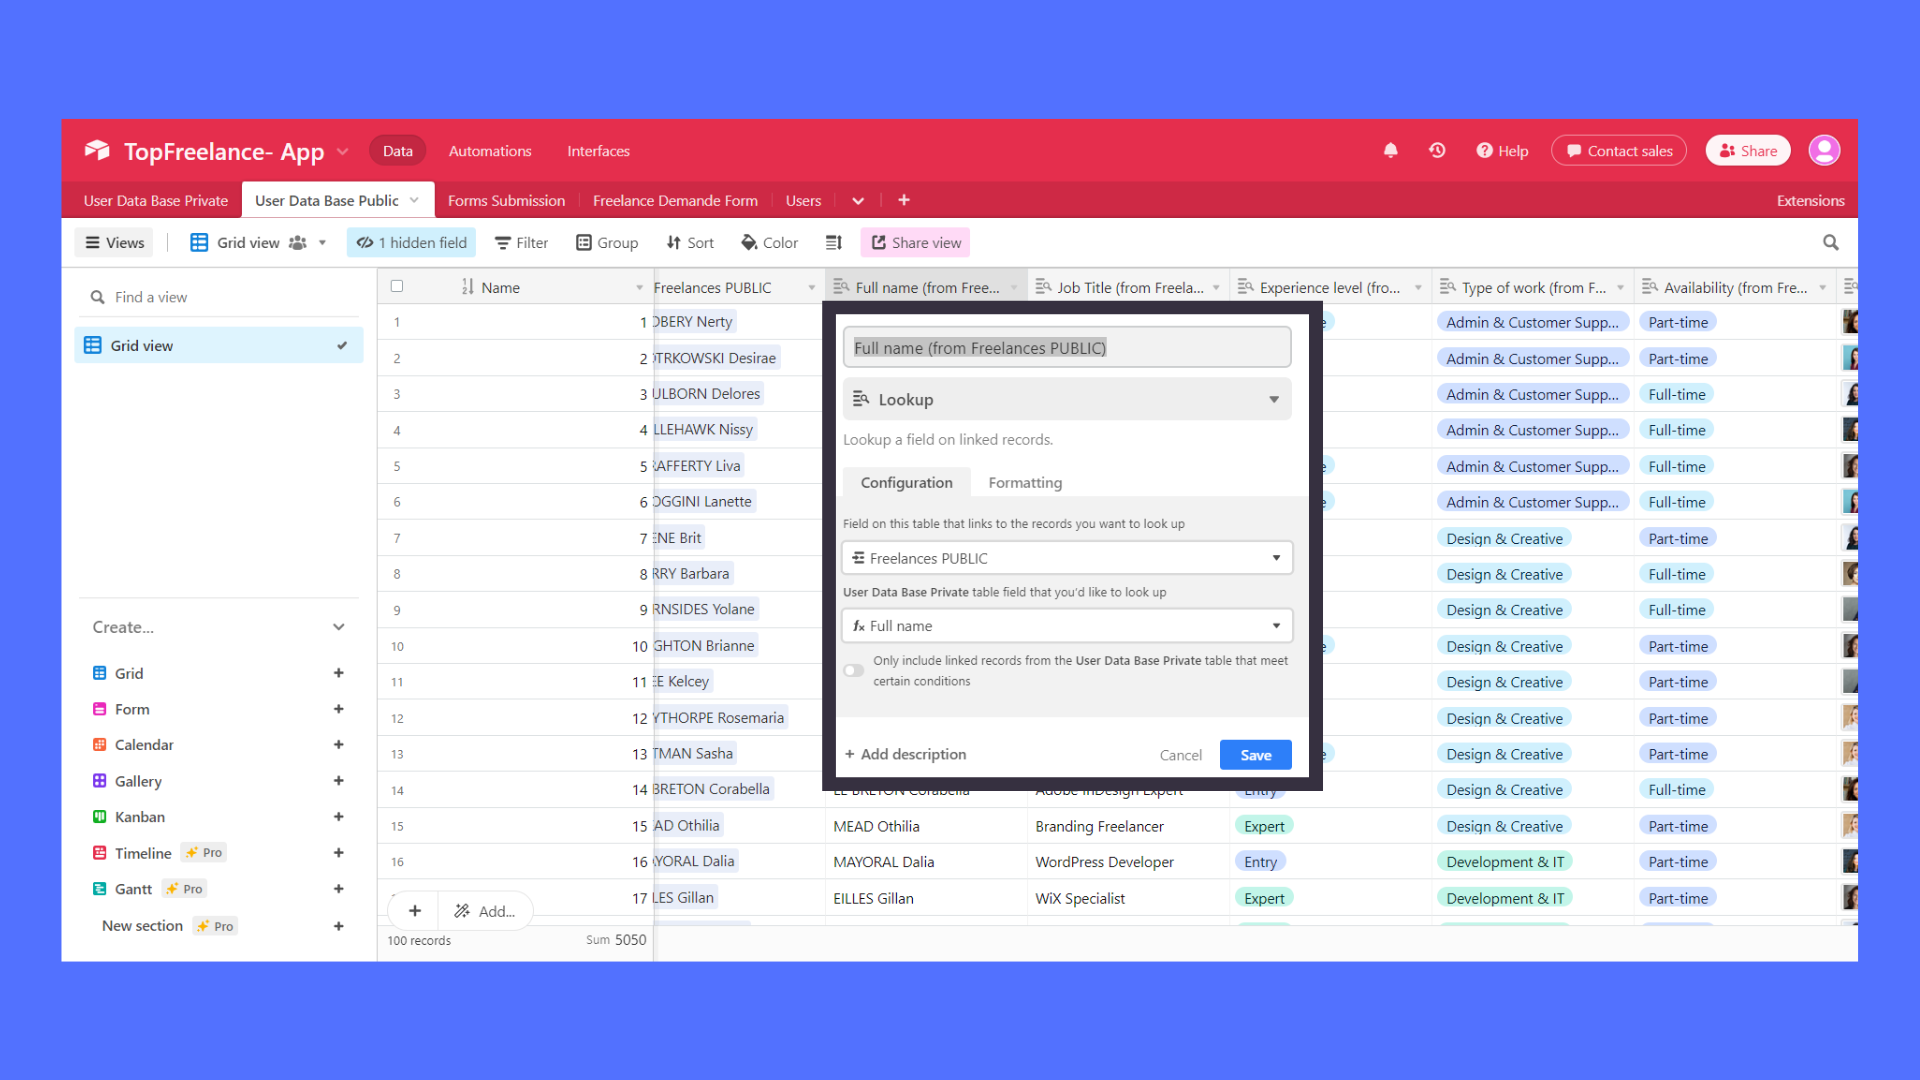
- Create a first lookup based on the “Link to another record” field created before. We are going to look-up information from our database table ”Private User Database” to the new table “Public User Database”.
- In this example, we will make lookups on the “Last Name” and “First Name” fields, which are considered as non-sensitive data.
Step 3: How to connect Airtable and Softr.io?
- Create an application in Softr.io.
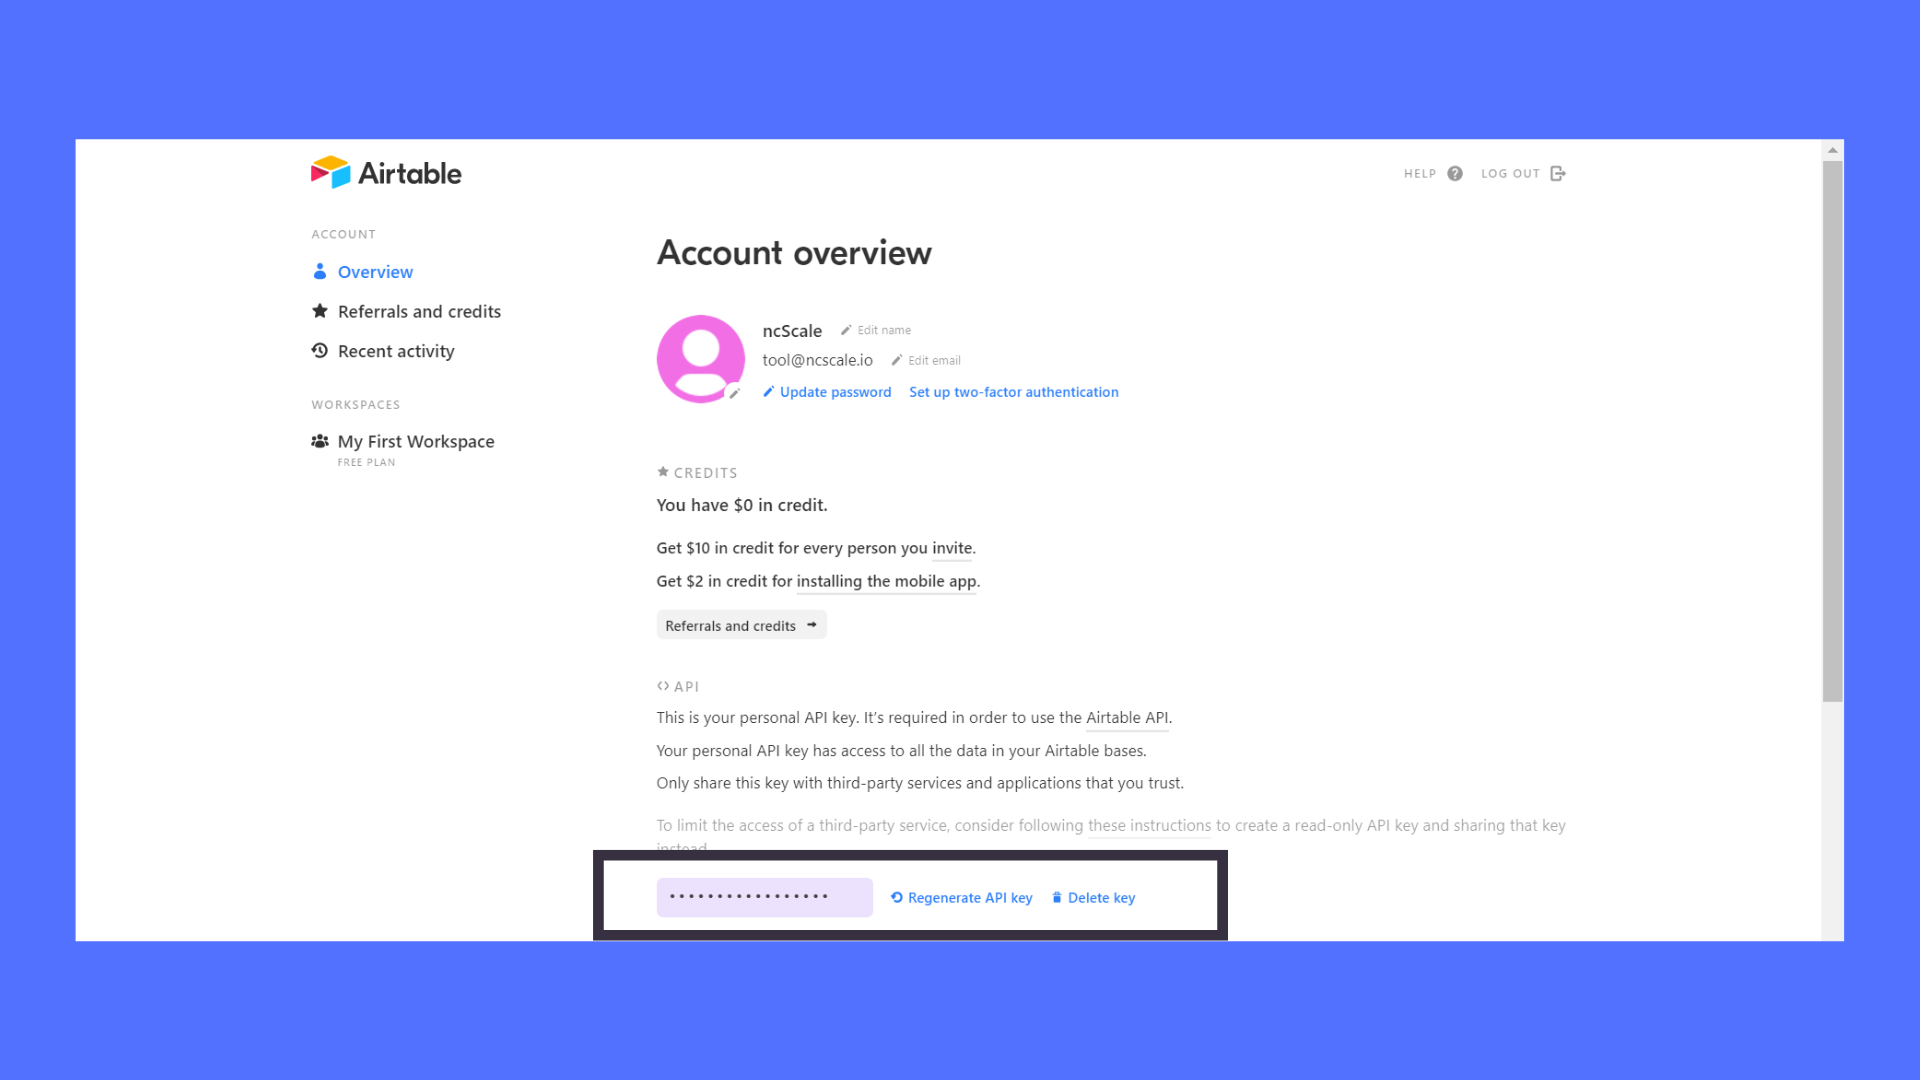
- Connect Softr.io to Airtable with an API key. First, you need to generate it.
- Go to your Airtable account, then “Account”.
- Then in the API section, press “Generate API Key”.
- Finally, copy and paste it into the API field of Softr.io.
Once done, you can add a block “list” to your application. Therefore, just select the database and then select the table with non-sensitive user data in this case “Public User Database” and set up all the fields required.
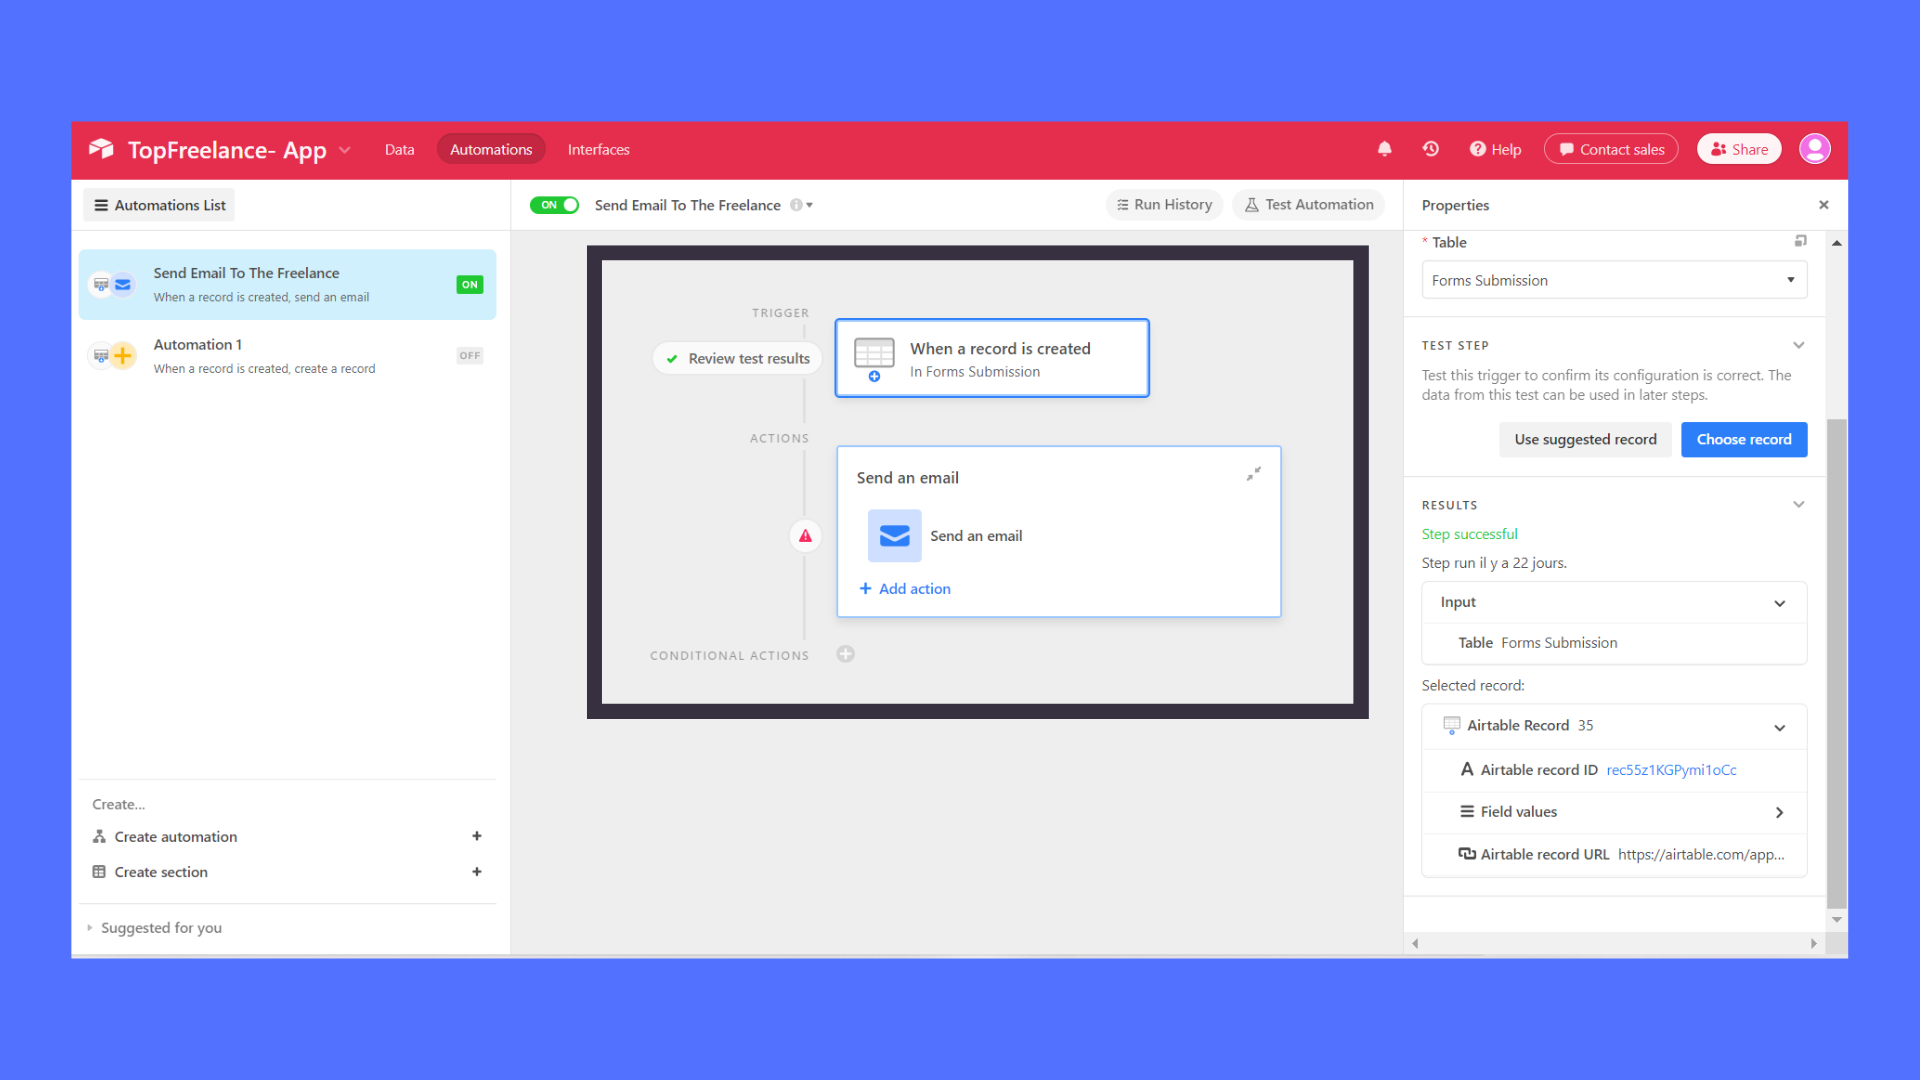
Step 4: Add automatically a new line in the private user database and duplicate it to the public table ?
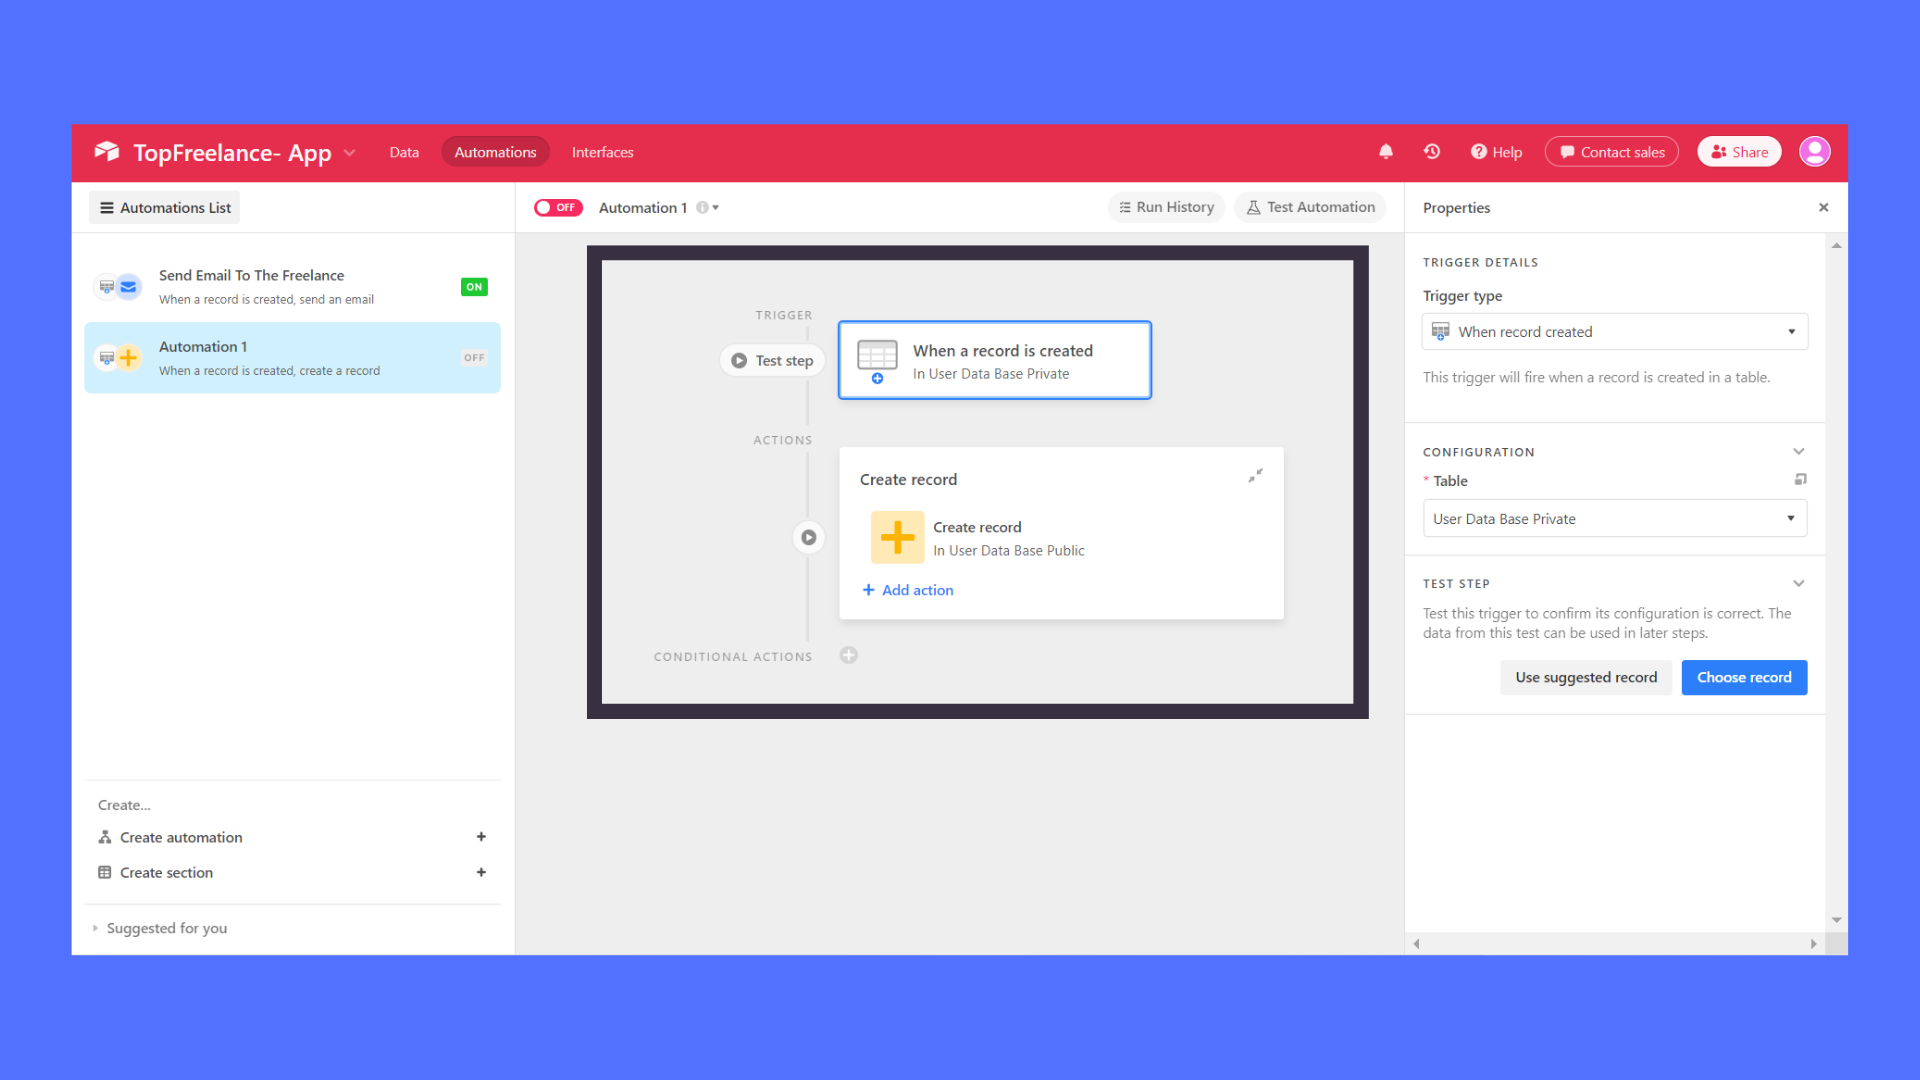
- First, you need to create an automation within Airtable. In order to do this, go to the Automation section.
- There, you have to define a trigger, regarding our case we have to use the following trigger : “When record created”. The condition has to be triggered from the “Private User Database”.
- The following action, based on this condition set up previously, would create a new record in Public User Database.
- Consequently, when a new record is created in your private table, a new record is created in the public table.
- In addition, if you make some change in the table “Private User Database”, thanks to the look-up all updates would be handled automatically by Airtable in the “Public User Database”.
Here is the link to the demo Airtable base : https://airtable.com/shrmlSkLr1MIebldw/tbl32WVR9rVOMYKdF/viwU4cHOYdzyc5Pxd?blocks=hide
It will help you build your own secure Airtable database.
Part II : Build the foundation in Softr.io
Step 1: Create the application within Softr.io
- If you already have your app created, go to the step 2
- Otherwise, in your dashboard, click to “New application”.
- Secondly, create a new app from scratch.
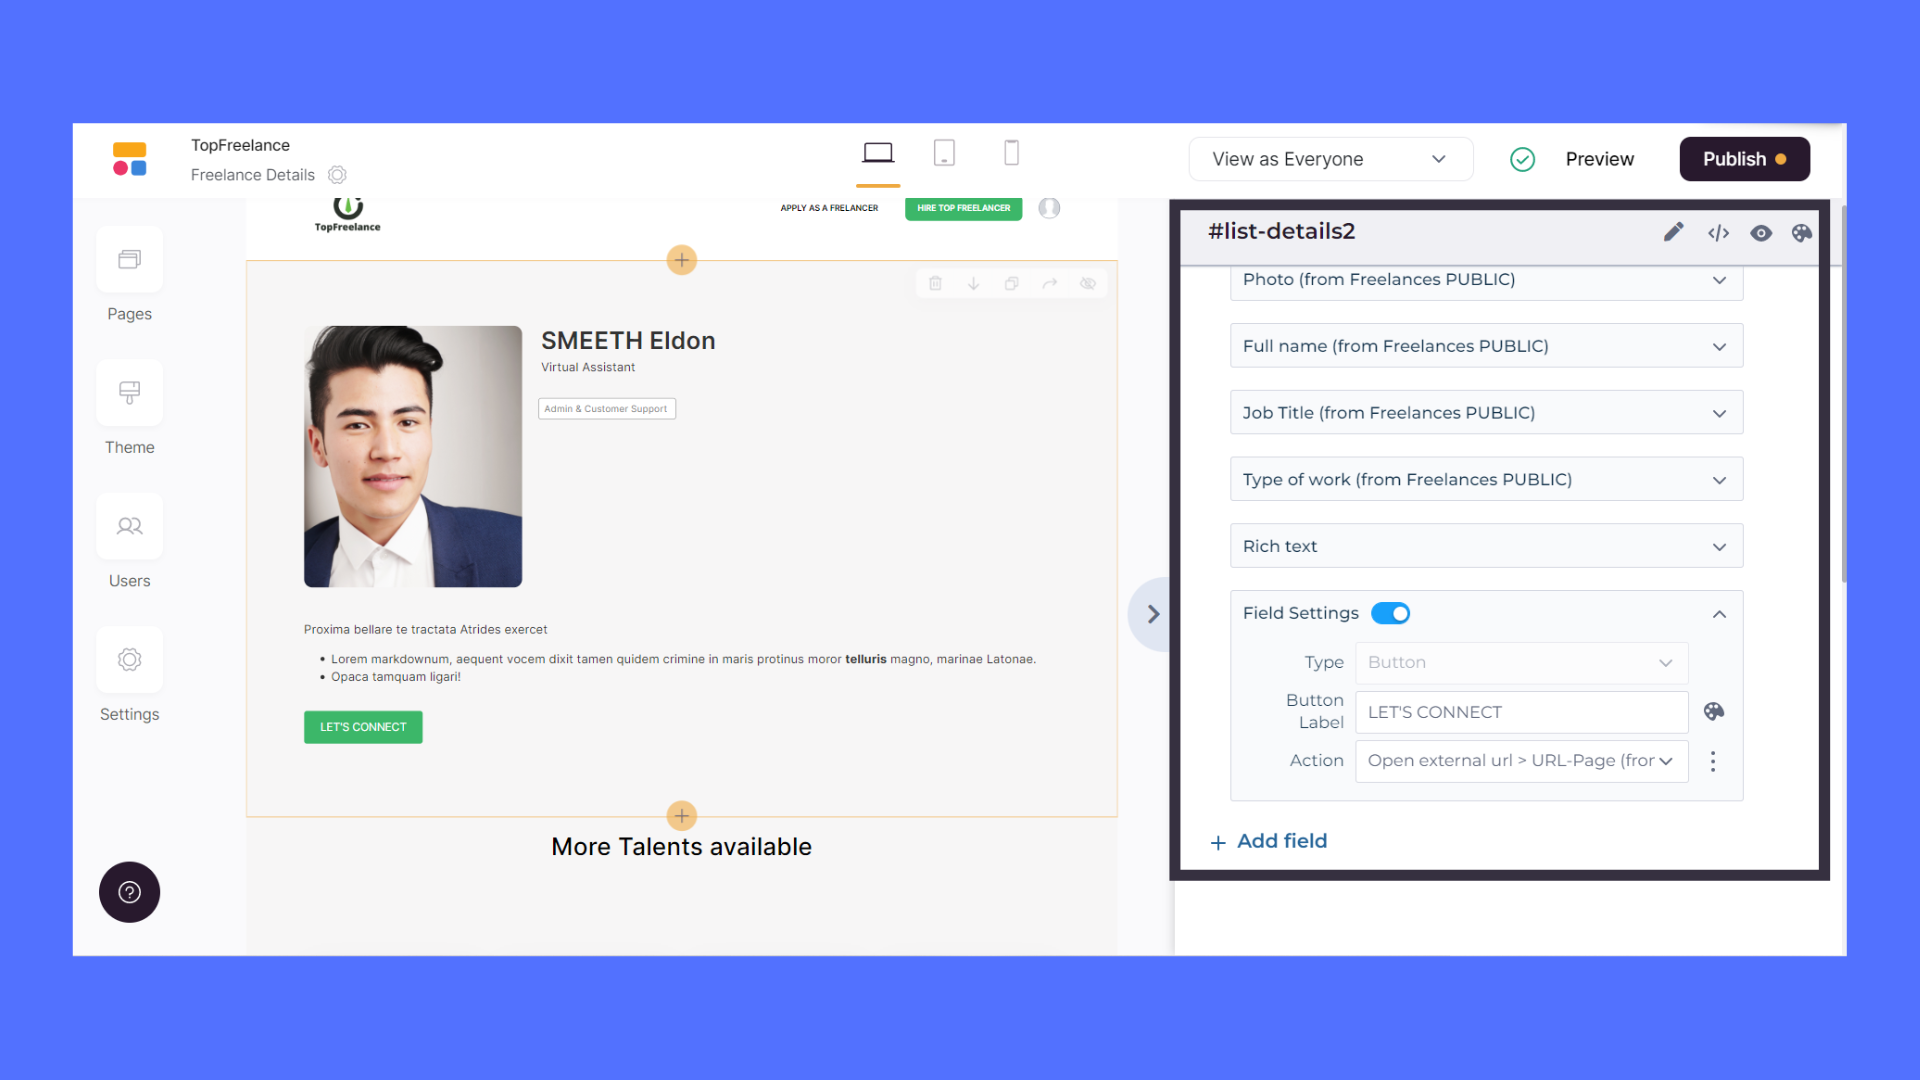
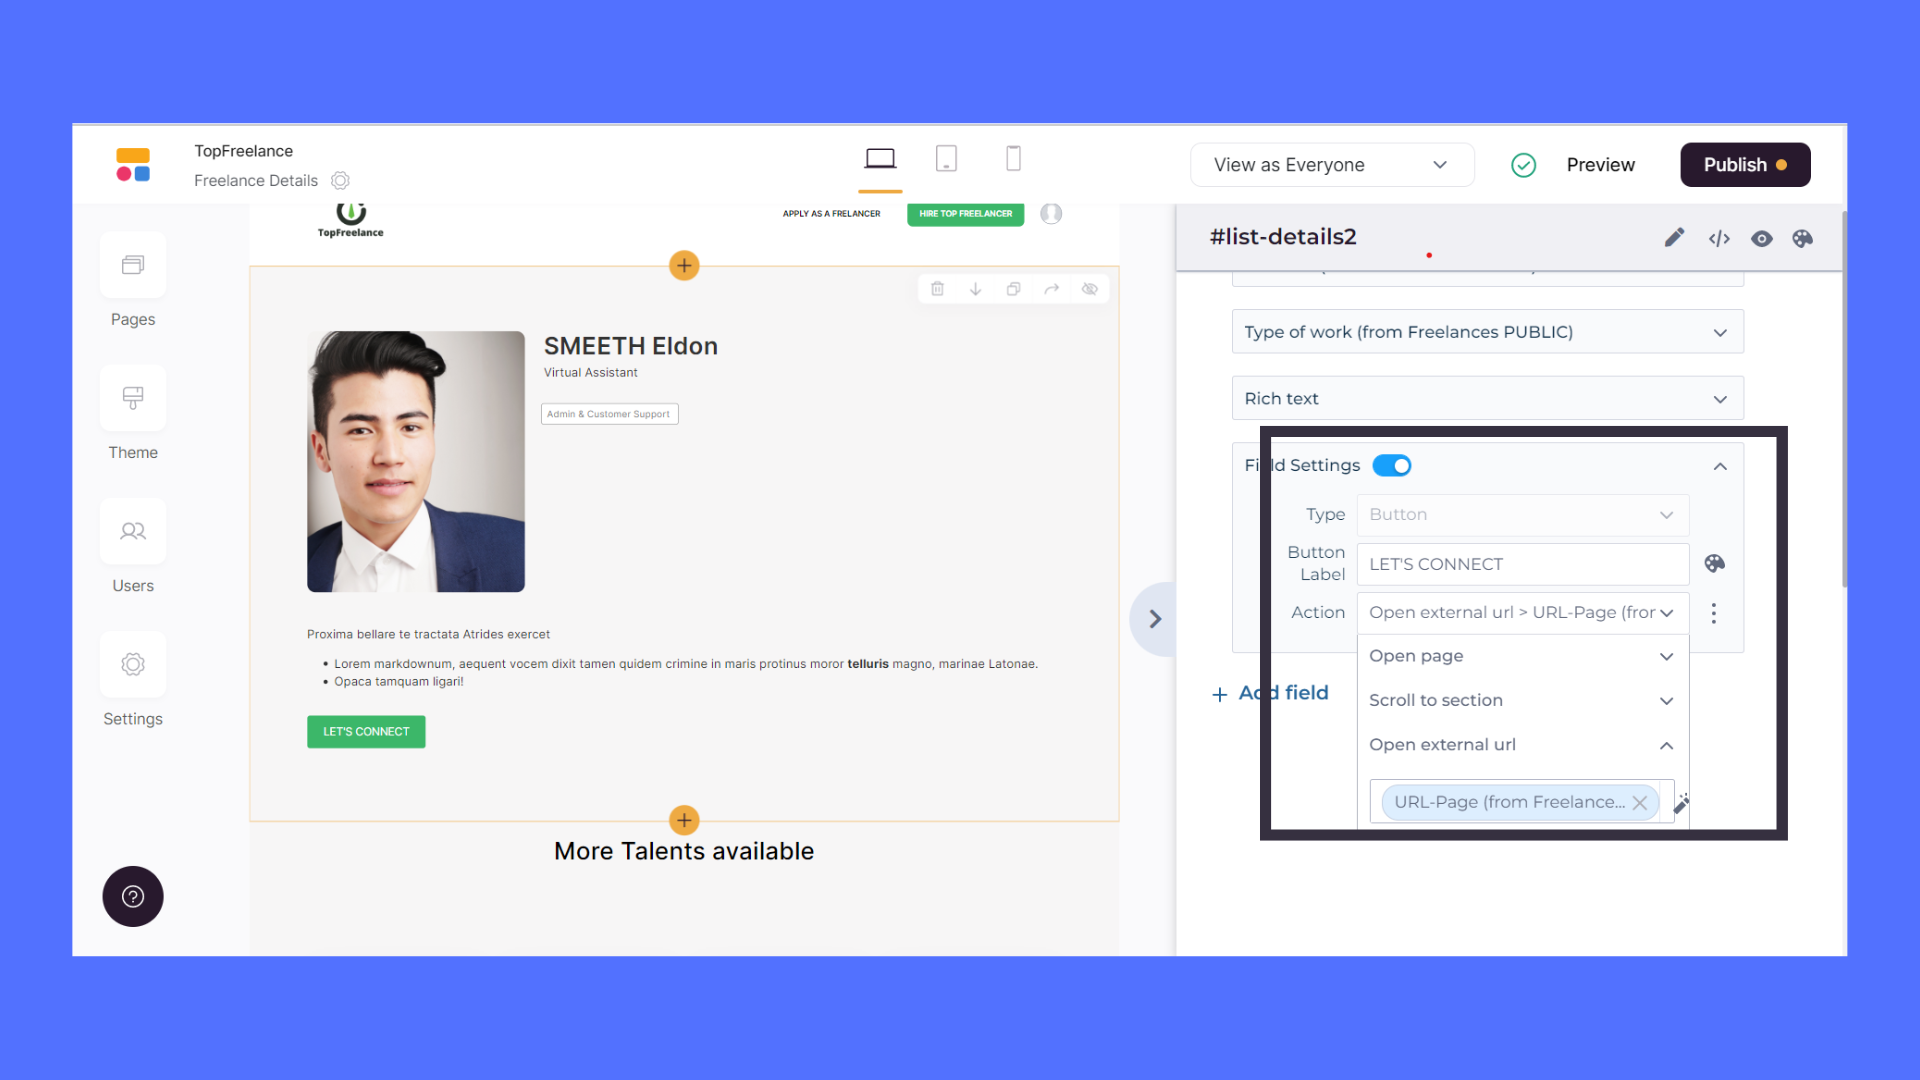
Step 2: Create a list block with a button in Softr.io
The goal is to connect a list block to a form and submit the form without having a security flaw.
- First of all, you need to create a “list detail” or a “list block” in Softr.io. For example, you can add it to the homepage of the marketplace.
- Select your database and then select the table with non-sensitive user data, in our case “Public User Database” and set up all the fields required.
- Once selected, choose a button field, and there select the “open external URL” option.
- We will set up the URL later. The URL will redirect the person to the custom form.
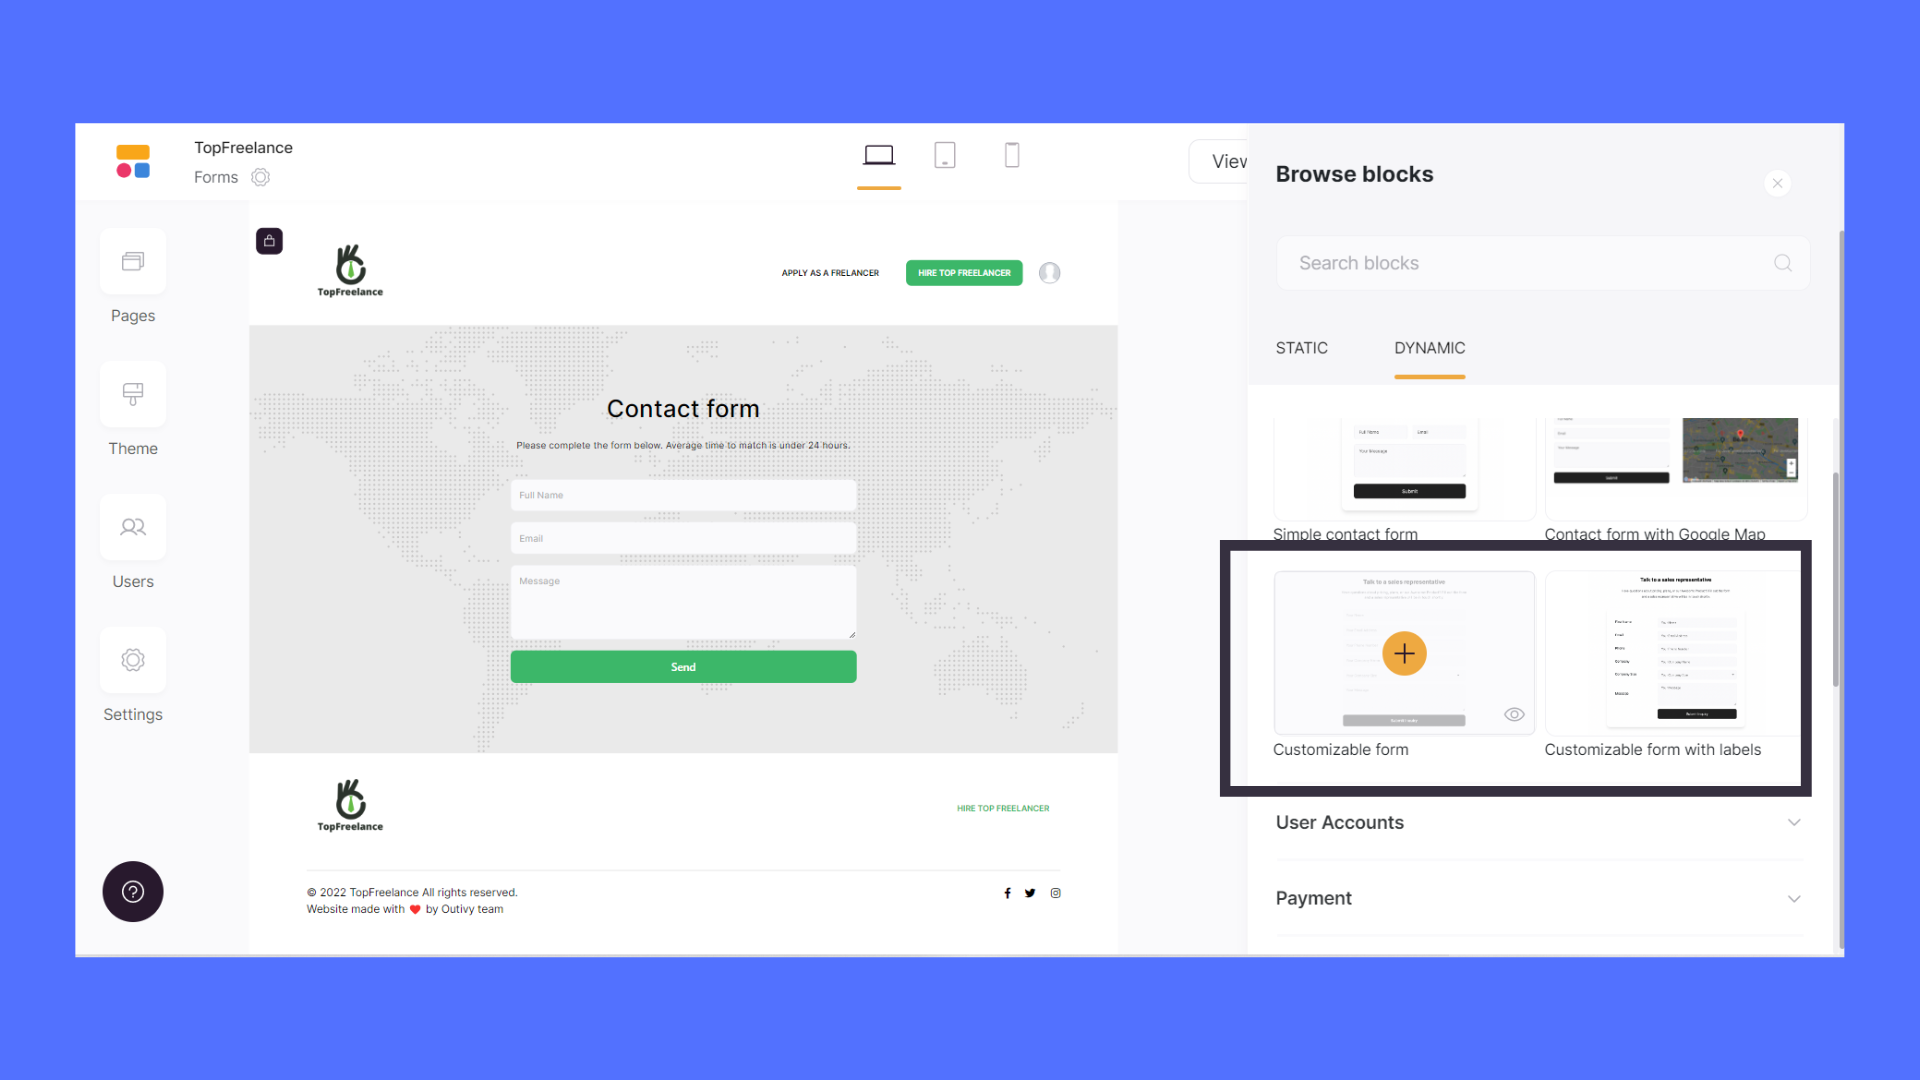
Step 3: Create a custom form in Softr.io
- Moreover, In Softr.io, you need to create a new page.
- Inside the new page, you have to create a form.
- In order to make everything work, select a “Customizable form” or a “Customizable form with labels”, both work. We selected one of those because we want to be able to add and customize the form.
And now, everything you need for your secure marketplace is now created on both Softr.io and Airtable. Now we’ll have to make them work together.
Part III : Make everything work between Softr.io and Airtable
Step 1: Create a new table “Form Submission” in Airtable to handle every form submission from Softr.io
- In Airtable now, inside the same database, create a new table, in our case, we will name it “Form Submission”.
- Delete all the columns created by default by Airtable.
- Change the first column of the Airtable table to an autonumber field.
- Inside this new table, create some new fields. We will use all of these fields to create our form in Softr.io
In our case :
- “Name”, Field Used: Single line text
- “First name”, Field Used: Single line text
- “Email”, Field Used: Email
- “Linked to private user database”, Field Used : Link to another record, (linked to “Private User Database”)
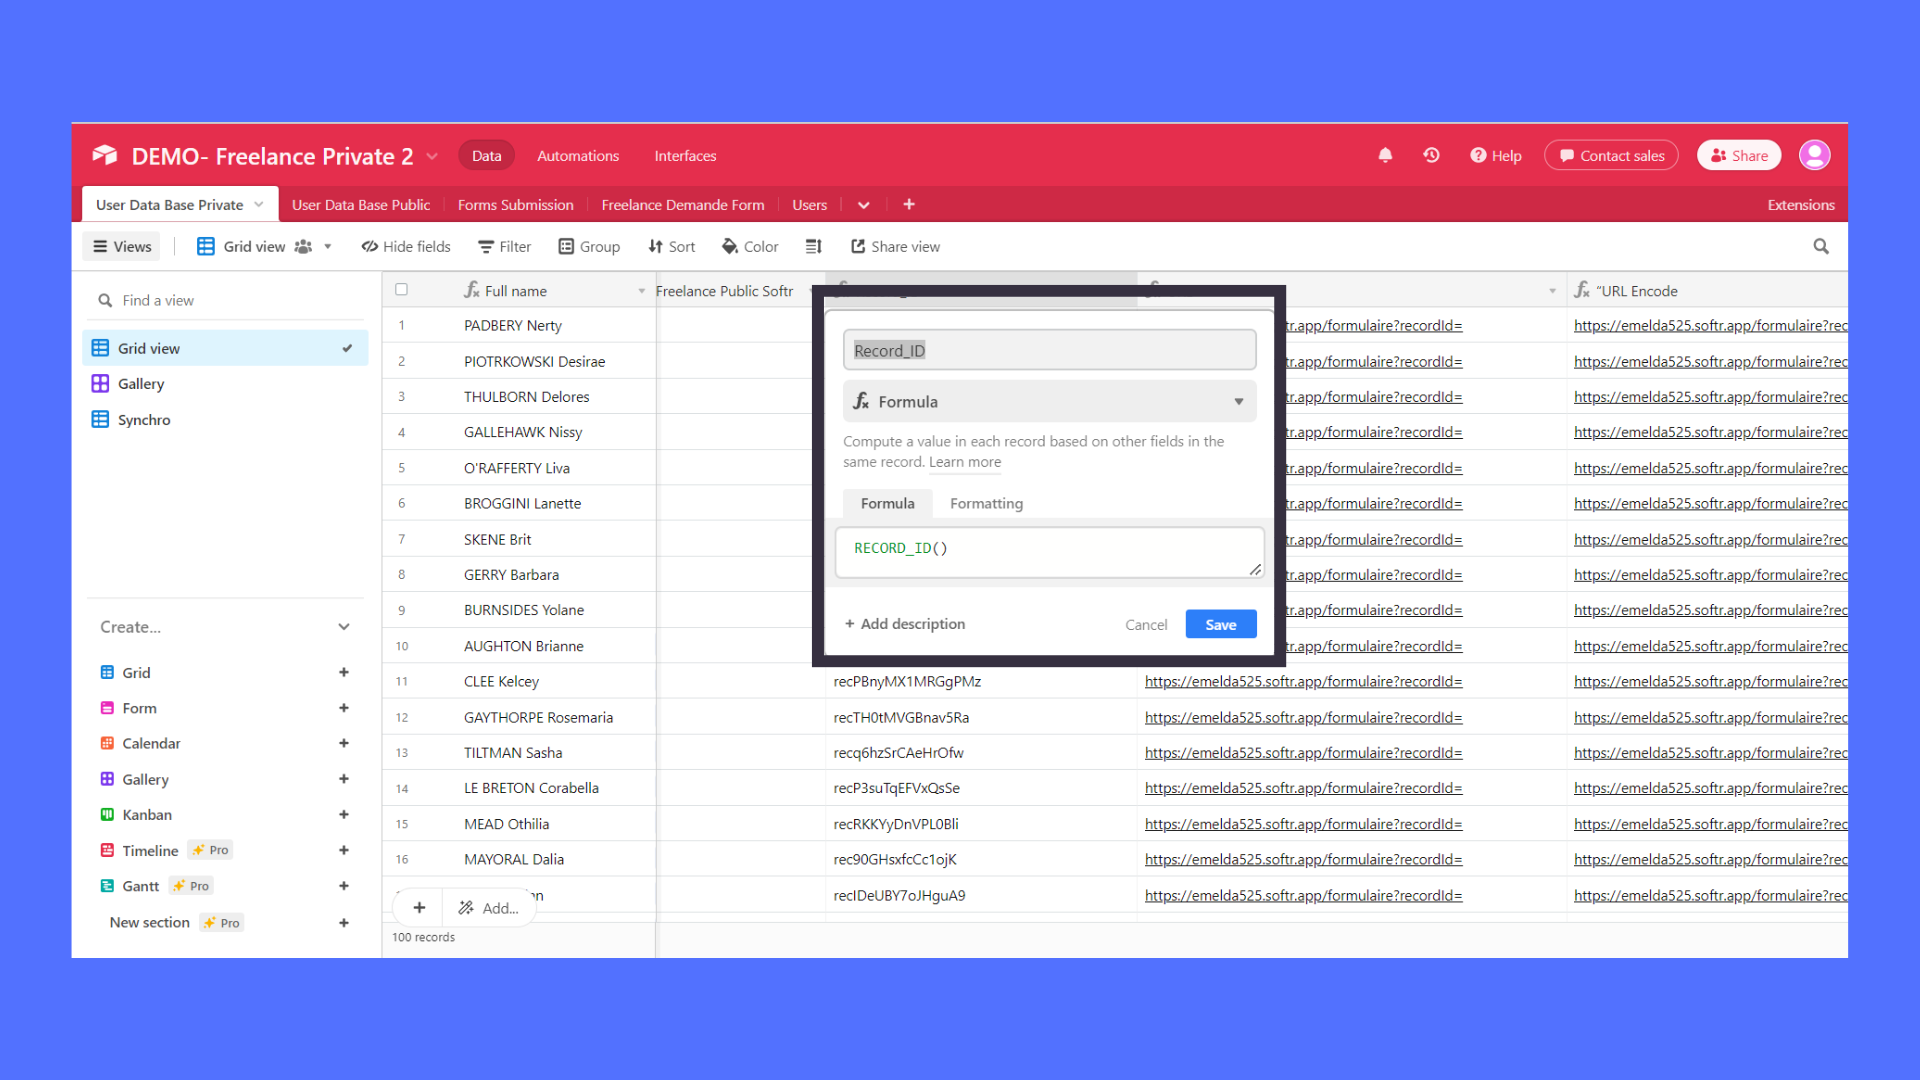
Step 2: Create the Reocord_ID field
- Once the table is created, go back to the “Private User Database” and create a new column.
- Select a formula field.
- Inside, use the formula “RECORD_ID()”, it will come up with all the record IDs of each line.
- We will name this new column “Record_ID”
Now, let’s head to the next step.
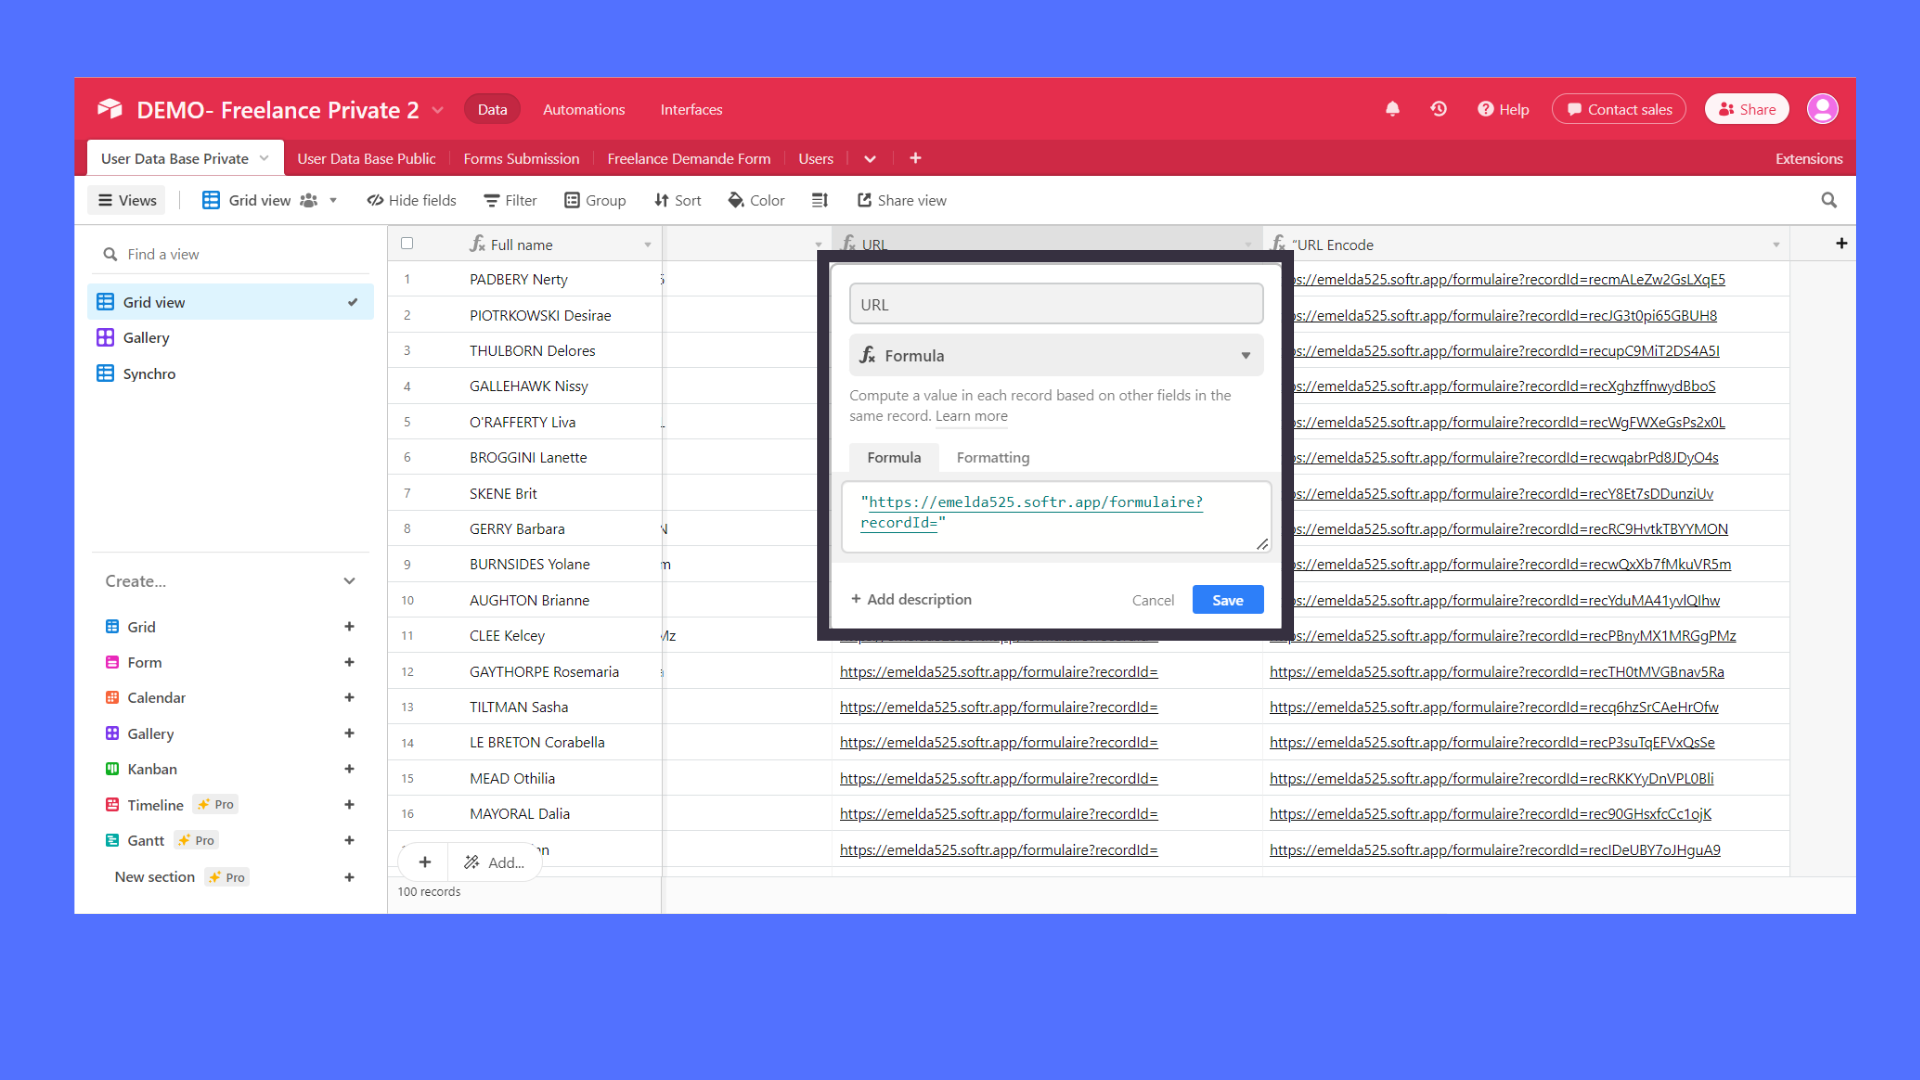
Step 3: Create the URL field
- Secondly, create another column in “Private User Database”.
- Select a formula field. Inside, use the quotation mark, and between each quotation mark insert the URL from the form page created earlier.
- It must come up as followed :”https://ncscale.softr.app/formulaire?recordId=rec0SdLb92kgLfa3e”
- By the way, the name of this column is “URL”.
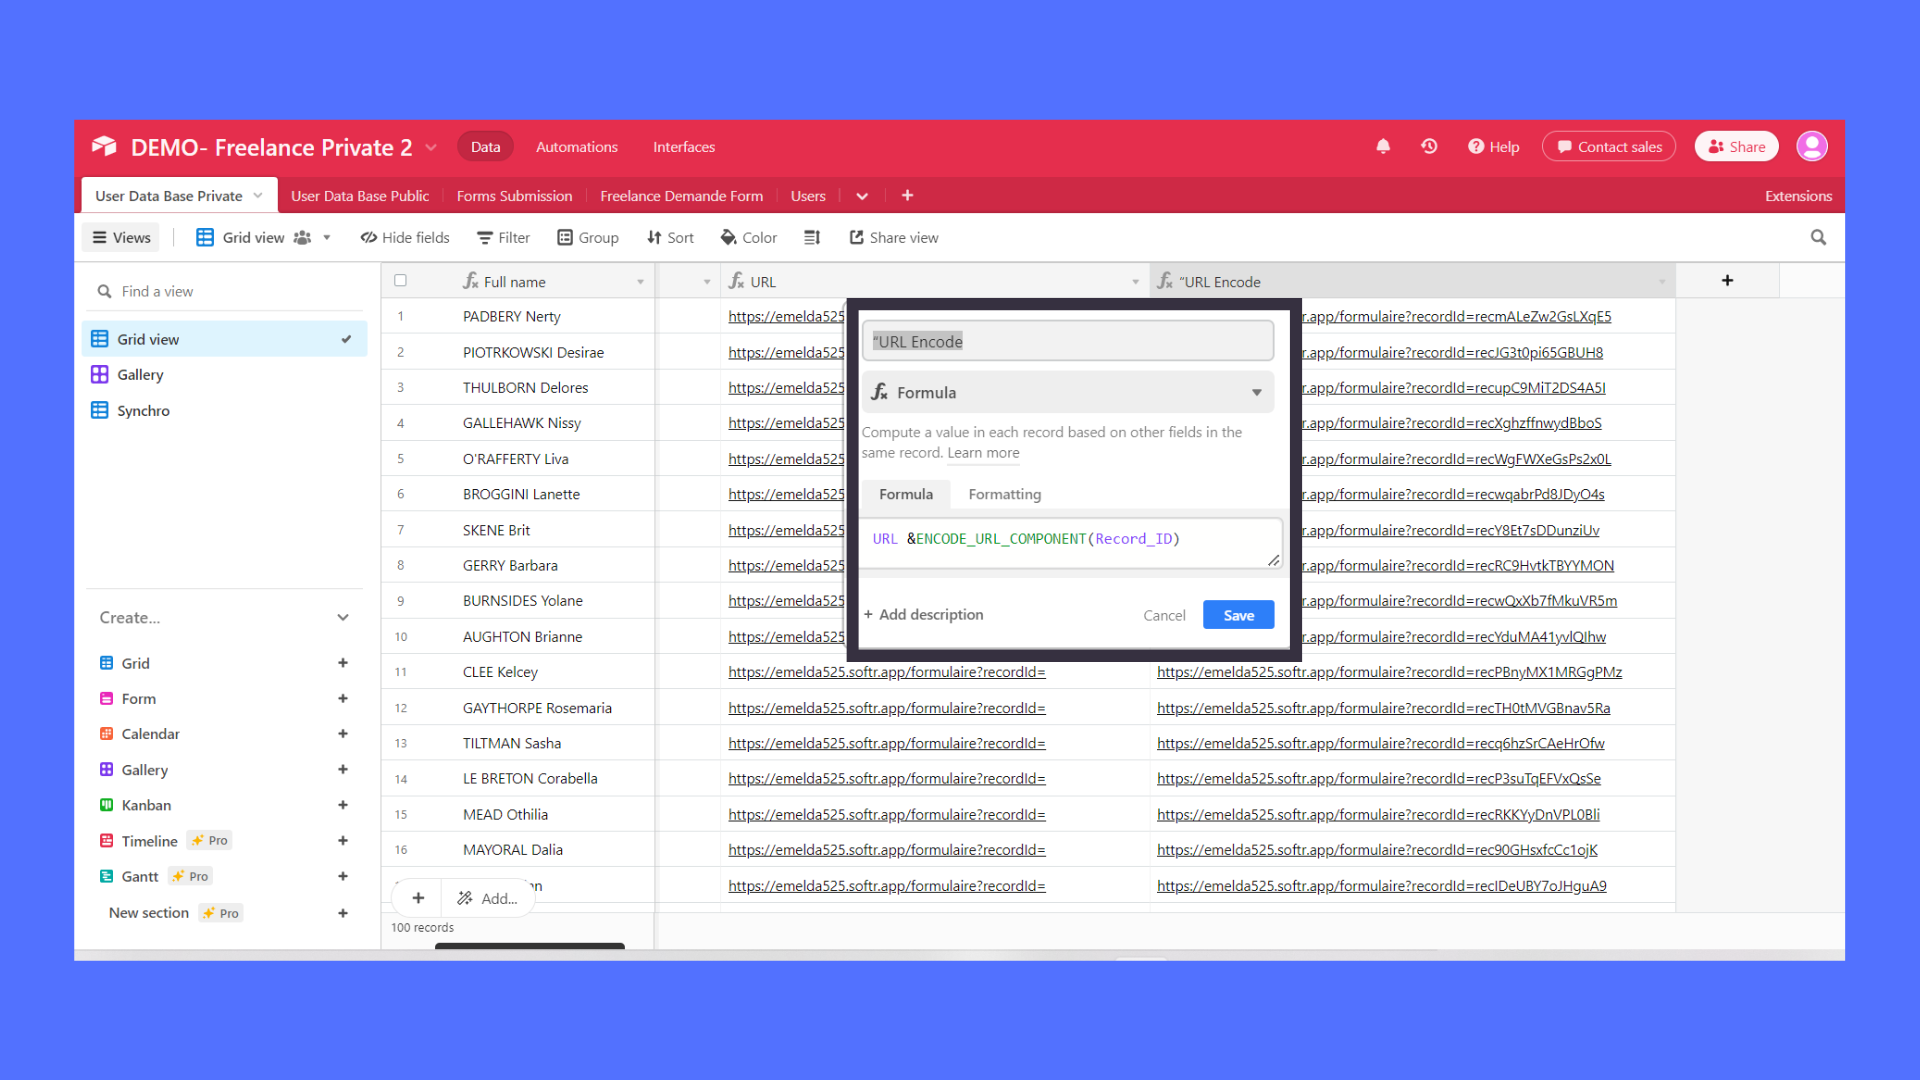
Step 4: Concatenate the record_id field with the URL field
- Finally, create the last column in “Private User Database” and select the formula field.
- We will concatenate the URL column with the Record ID column.
- In order to do this, we need to encode the form from Softr.io and the record ID from Airtable.
- Therefore, you need to insert in the formula field the following formula : “(Name of the URL Column) &ENCODE_URL_COMPONENT(Name of the Record ID column)”.
- You can rename this field “URL Encode” to make the mapping easier.
Once this is done, create a look-up in the table “Public User Database” from “Private User Database”. We need to add a look-up because we cannot link Softr.io directly to our private table.
- You will need to add look-up to the last formula field created, in our case “URL Encode”.
- Once this is done, you need to create a formula field in the table “Public User Database”.
- Inside this formula field, put the look-up field into it. The formula would look like {URL-Encode (from Private User Database)}.
- You can rename the last formula field created “URL Softr.io.”
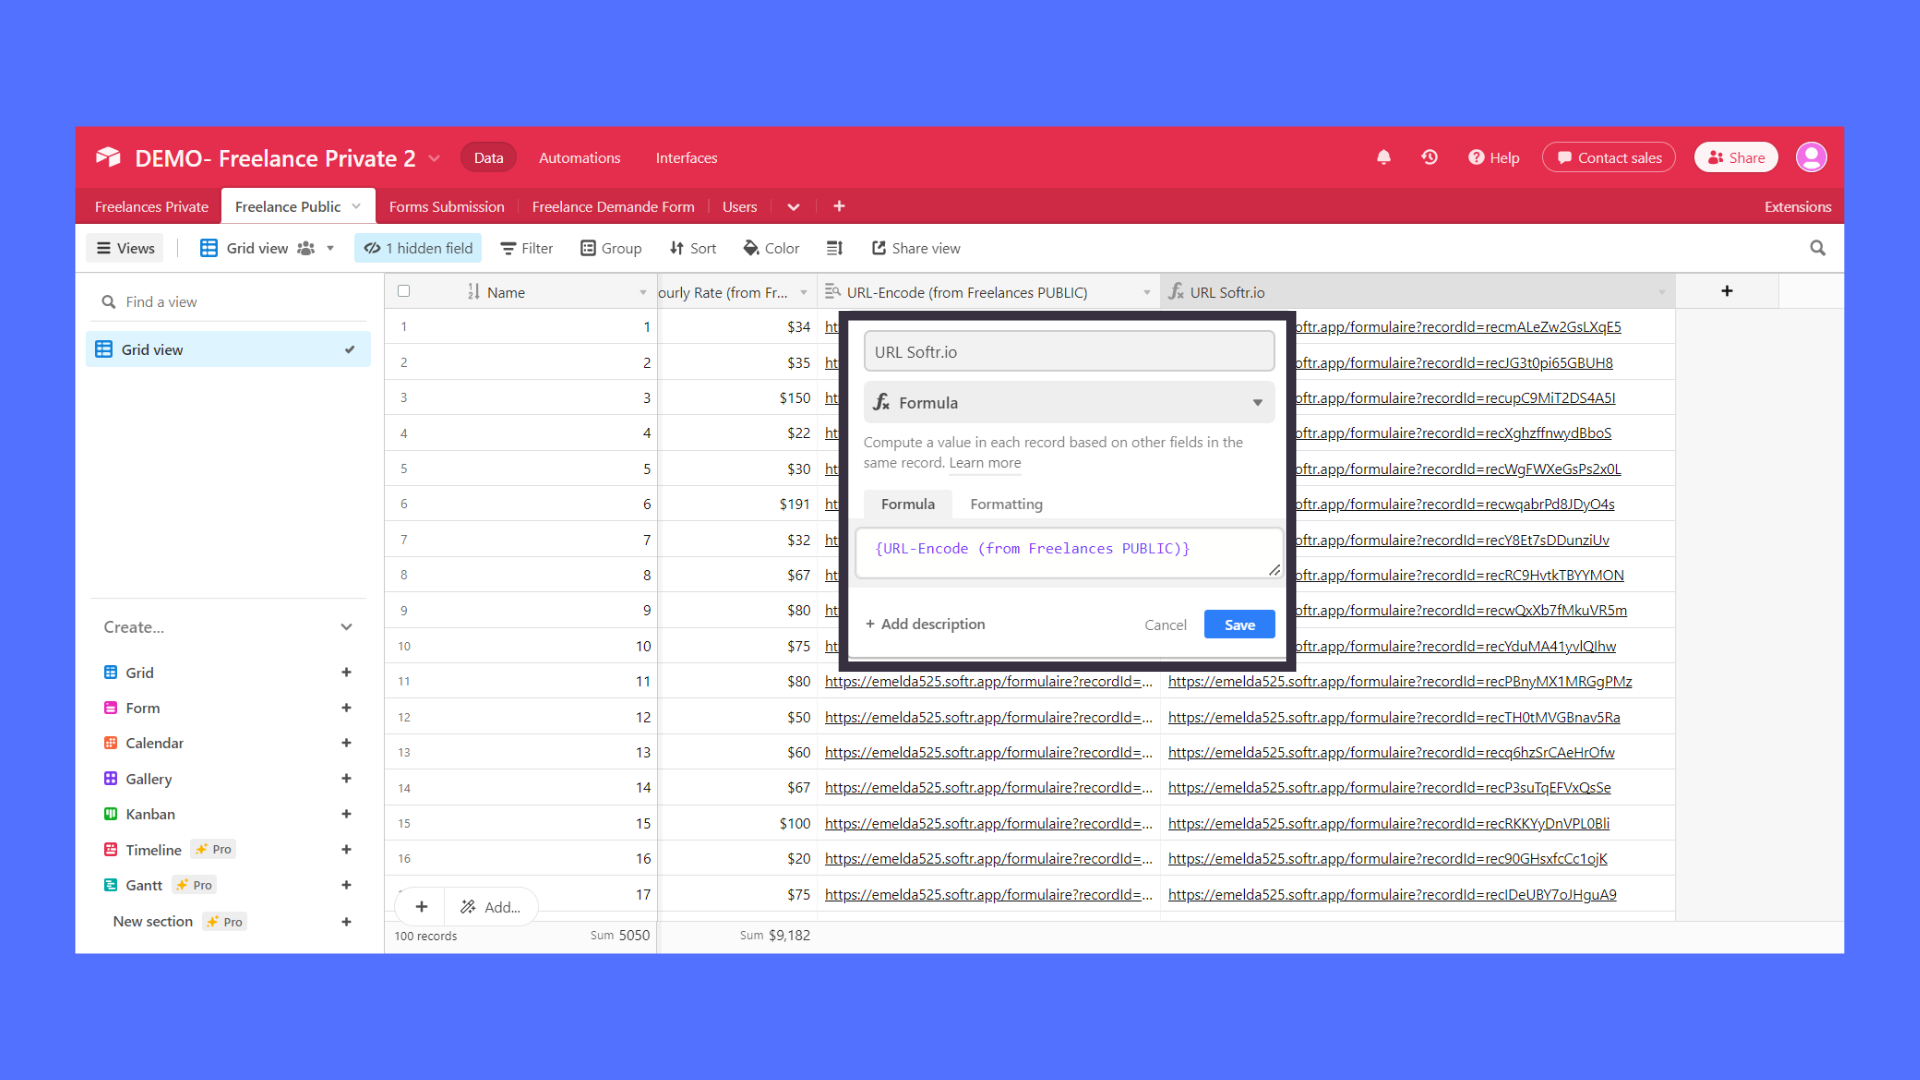
Therefore, we will put the field “URL Softr.io” from the table “Public User Database”, to the button created earlier in the list block. In the open external URL section, you can map the field “URL Softr.io”.
Let’s come back to the custom form creation in Softr.io.
- First, you need to create the custom form inside the new page created earlier in Softr.io.
- Once your form is created, you need to map all the fields from the Airtable table “Form Submission”.
- In the Form section of the custom form, you need to map all the fields needed.
In our case :
- Full Name, Field Used: Single-line text
- Message, Field Used: Long text
- Email, Field Used: Email
Step 5: Use the hidden field feature
In order to connect the private database user to the public one through a form submission, we need to use the hidden field feature from Softr.io custom forms.
- Now below the form section go to the Button section.
- There, in “text”, you can write “Send ”.
- In “action”, you need to select Airtable and in “Base” select your Airtable Base.
- In “Table”, select the new table created for the form, in our case Submission.
When you are setting up the form, don’t forget to select the right Airtable base and the right table. In our case, we want to send the form submission to the User database and to the table “Submission”.
- In the form section of the custom form, select “add field” then in “Type” choose hidden, in “Value” put {URL_PARAM:recordId}.
- This way, the form will use the given Record-ID provided by the URL to make the link in Airtable.
- Finally, in “TAG” put the exact name of your column linked record, in our case “Linked to private user database”.
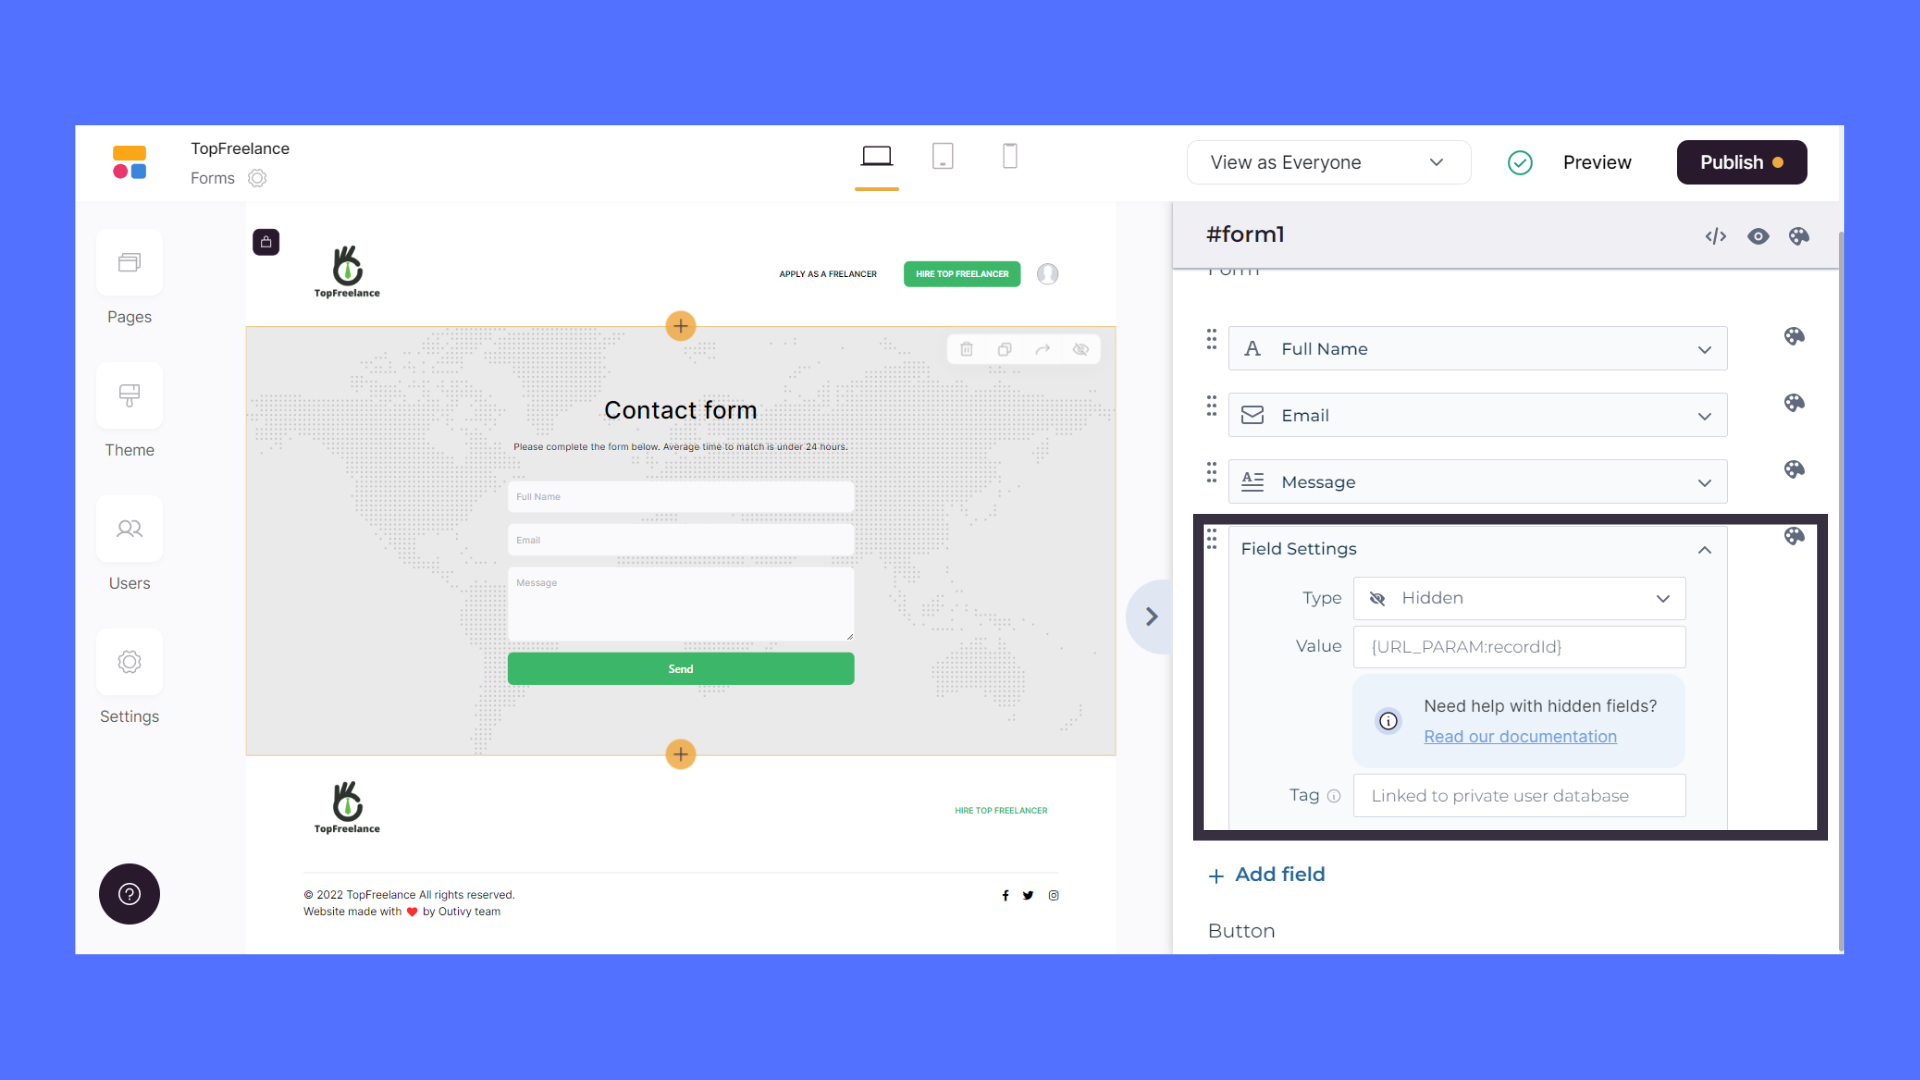
Hence, when someone fills out and submits the form, it will be sent to the Airtable table Submission and linked to the right record from the table “Private User Database”.
Here is the link of one secure app built on Softr.io https://ncScale-marketplacedemo.softr.app
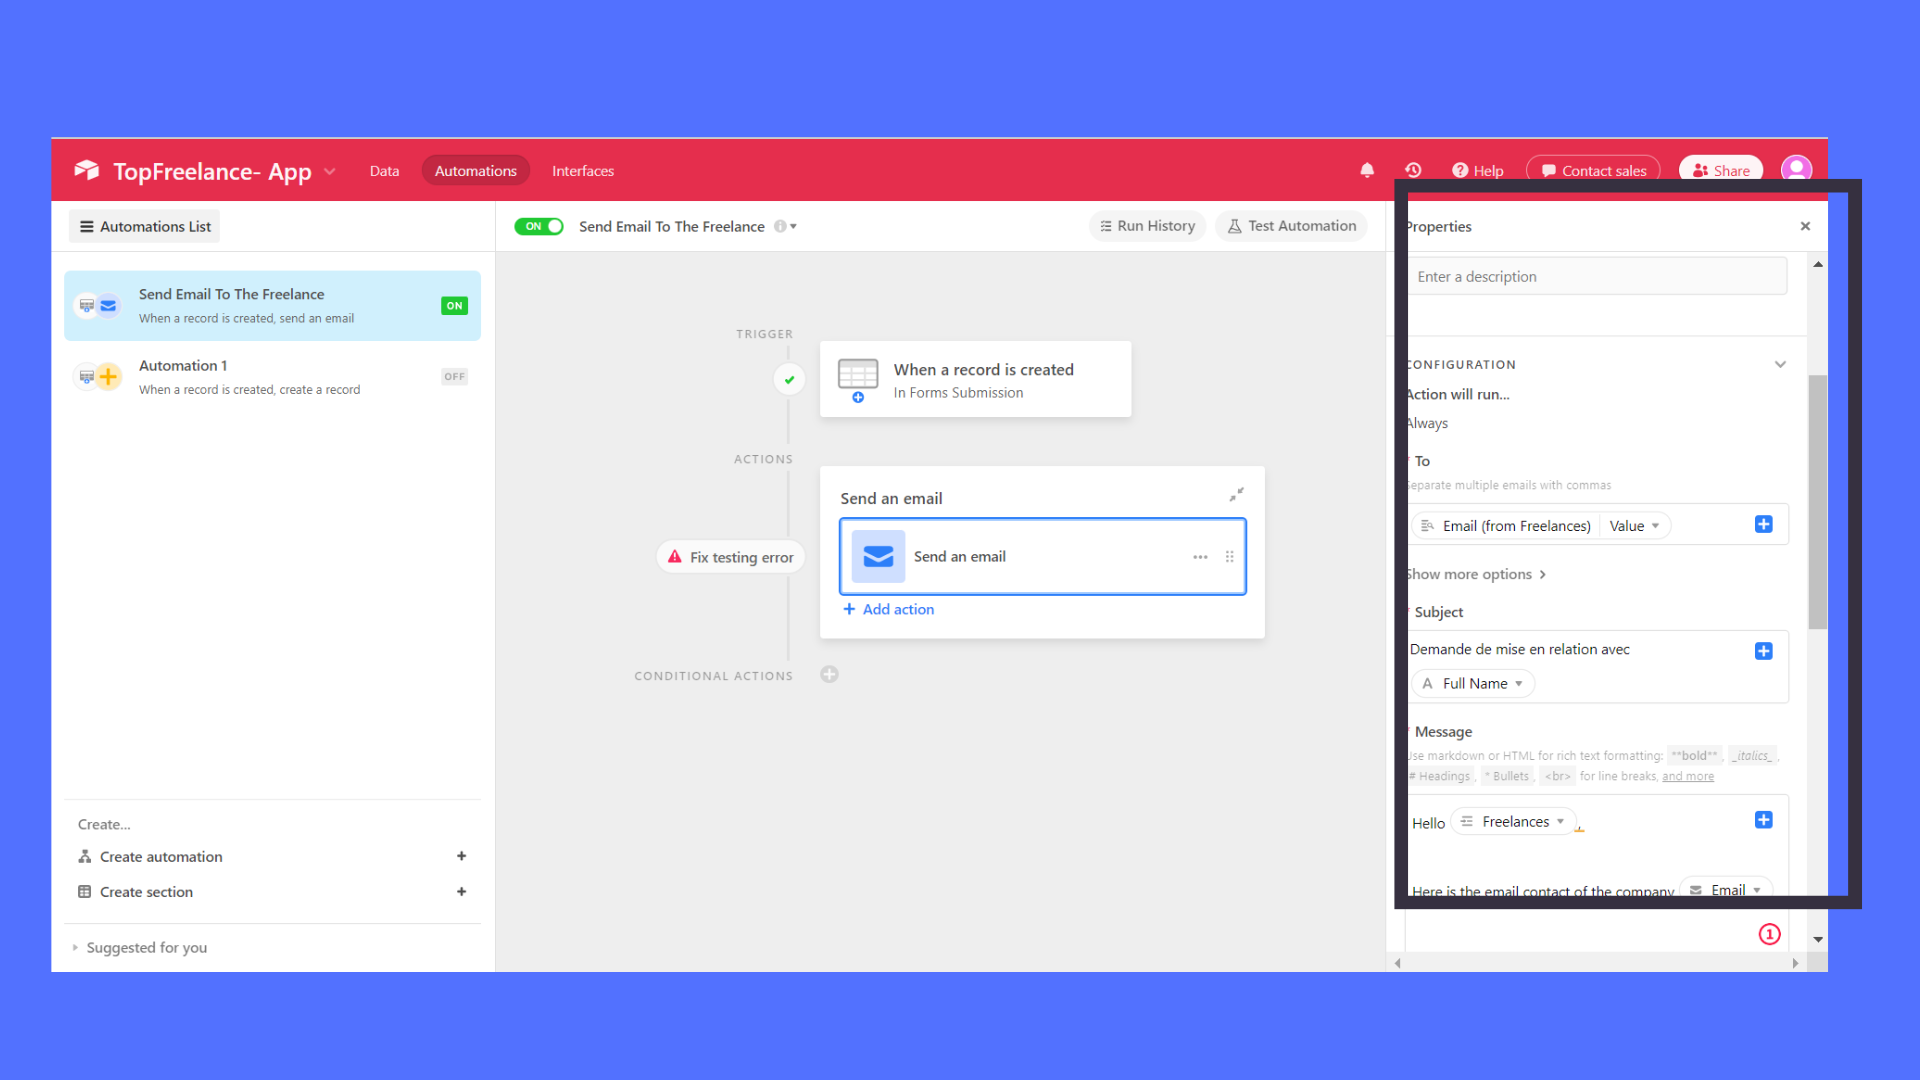
Step 6: Automatically email a user in the private table after a form submission from Softr.io.
- In order to email a user in the private table, we will need to create an Airtable automation.
- There you have to define a trigger, regarding our case we have to use the following trigger : “When record created”. The condition has to be triggered from the table “Submission”.
- The following action, base on this condition set up previously, would be “Send an email”
- In this part you have to map some fields like “To”, “Subject” and “Message”.
- In addition, you also have the opportunity to add some attachments.
- This automation is possible because previously we made the link thanks to the URL Encoded with the record ID of the “Private User Database”
And now, let’s check that your marketplace using Airtable and Softr.io is really secure.
Part IV : Check the safety of our application
Once all your Softr.io fields are set, you just have to publish your application and check that the sensitive information of your users is not accessible.
- To do so, go to the app published.
- There, right-click on “Inspect”.
- Then, go to the “Network” section and refresh the page.
- Click on “records?bloc_id=”.
- Finally, go to the “Overview” tab and pull down the “record” tab.
As a reminder, we do not want the “email” and “phone” fields to be accessible or visible.
Overall, you have just duplicated your user table in Airtable. Moreover, with the help of ”look-up”, you will only fetch the data from your user table that you want to leave “public”. However, this method has an issue, it can quickly become time-consuming. Otherwise, you have to create some Airtable automation to handle this issue, as explained previously.
Part V : Which actions should be avoided?
You should not link your user table directly to Softr.io. We strongly recommend that you implement our look-up method to protect any sensitive data. Hence, if you do link some tables with sensitive data, it will be public to everyone.
In addition, If you use the ” hide a row” function in Airtable, you should be aware that the data will remain visible and accessible. The ” hide a row” function does not allow you to hide your users’ sensitive data from the rest of the world when you link it to Softr.io, it only hides it from you.
Part VI : Conclusion
Overall, manipulating sensitive and non-sensitive data is not easy. However, by using the look-up method, you will be able to create, build and share a secure marketplace with Softr.io and Airtable for everyone.
If you have any questions, don’t hesitate to post it in comments, we would happily answer them!